

From Our Field Notes · Crawl Space Guide
Crawl Space Sealing: 6 Powerful Steps to Stop Water, Pests, and Heat Loss in Your DMV Home
A practical guide from an engineer-founded waterproofer with 20+ years of DMV field experience.
Crawl space sealing is one of the most searched terms by DMV homeowners trying to fix moisture, pests, or rising energy bills – and one of the most misunderstood. Most homeowners think sealing is a single product or a simple project. It’s not. Done right, crawl space sealing is a multi-material system that stops water, blocks pests, fills structural gaps, and improves insulation – all at the same time.
Based on our 20+ years of field experience across Maryland, Virginia, and DC, this guide explains what crawl space sealing actually involves, why it matters for DMV homes, and how the 6 sealing steps work together as part of a complete crawl space encapsulation system.
What Is Crawl Space Sealing?
Crawl space sealing means closing every path that water, air, pests, or moisture can use to get into your crawl space. A properly sealed crawl space is:
- Water-tight from the soil and foundation walls – no groundwater seepage, no surface water intrusion.
- Routed for drainage if water does enter – instead of pooling, water is directed to a sump pump and pumped away.
- Closed to outside air – old vents are sealed, because vented crawl spaces in humid DMV summers actually pull moisture in.
- Closed to pests, rodents, and insects – every gap, hole, and penetration is sealed with the right material.
- Properly insulated against heat loss – using fire-rated insulation where required by code.
This is why crawl space sealing is best understood as part of a broader crawl space encapsulation system. Sealing alone – without addressing drainage, vents, and insulation together – usually fails within a few years.
Why DMV Homes Need Crawl Space Sealing
The DMV climate is one of the worst in the country for crawl spaces. We get hot, humid summers; cold winters with freeze-thaw cycles; and 40+ inches of annual rainfall. The soil is mostly clay, which holds water and pushes it sideways into foundations.
An unsealed crawl space in this climate becomes:
- A moisture reservoir that feeds mold growth on floor joists and subfloor
- A point of entry for rodents, snakes, raccoons, and insects
- A thermal weak spot that drives up heating and cooling bills
- A source of musty, unhealthy air that rises into the living space through the stack effect
The EPA’s moisture management guide confirms that controlling crawl space moisture is one of the most effective ways to improve indoor air quality.
The 6 Steps of Proper Crawl Space Sealing
Real crawl space sealing isn’t a single product applied to a single surface. It’s six steps, each using the right material for the specific problem. Cutting corners on any one step usually causes the others to fail.
Step 1: Inspection and Diagnosis
Before sealing anything, the crawl space is inspected to identify every entry point: water sources, pest holes, foundation cracks, failed vapor barriers, gaps around pipes and ducts, and any structural openings. Sealing the wrong gap or missing the actual problem source is one of the most common mistakes we see in DIY and competitor work.
Step 2: Drainage and Sump Pump (When Needed)
If groundwater is reaching the crawl space, sealing alone won’t fix it – the water will just find another path. We install an interior drainage system at footer depth and a sump pump that routes water away from the home. Not every crawl space needs this; it depends on what we find during inspection.
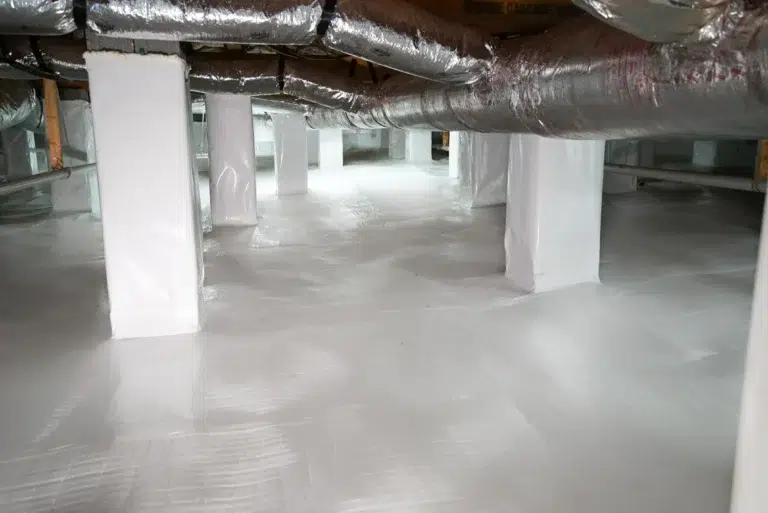
Step 3: Vapor Barrier Installation
A reinforced vapor barrier (12 to 20 mil, depending on conditions) is installed across the entire floor and up the walls to the grading line. This is the primary moisture seal and the foundation of every other step.
Step 4: Closing Pest and Rodent Entry Points
This is where material selection matters most. Different gaps need different solutions:
- Animal entry holes: sealed with heavy-gauge metal mesh – rodents chew through foam and caulk, but not steel mesh.
- Larger structural gaps: filled with concrete or hydraulic cement to permanently close the opening.
- Pipe penetrations and small gaps: sealed with polyurethane sealant or foam, depending on the gap size and location.
This multi-material approach is what separates real crawl space sealing from a quick caulk job. Most pest entry attempts happen in the first six months after a job – if the wrong material was used, you’ll see the failure quickly.
Step 5: Sealing Vents
Old building codes required vented crawl spaces, but in humid DMV summers, vents pull moisture-laden outside air into the cooler crawl space, where it condenses on every surface. As part of sealing, we close existing vents permanently.
Step 6: Insulation (When Needed)
If the existing insulation is missing, damaged, or inadequate, we install or replace it as part of the sealing process. We use fire-rated insulation where required by code – this is a detail that’s easy to overlook but critical for safety and inspection compliance. Skipping fire-rated material to save money is one of the most common mistakes in cheap crawl space jobs.
Crawl Space Sealing vs Encapsulation – What’s the Difference?
This is one of the most common questions we get. The honest answer is that crawl space sealing is one part of a complete encapsulation system. People use the terms interchangeably, but technically:
- Sealing means closing every entry point – water, air, pests, gaps.
- Encapsulation includes sealing, plus the vapor barrier system, drainage, dehumidification (when needed), and air management.
If you’re searching for “crawl space sealing” because you want a quick fix, what you actually need is the right combination of these steps for your specific crawl space. We don’t recommend sealing alone – it almost always fails without the supporting system.
For the full picture of what a complete project looks like, see our deep dive on crawl space encapsulation.
What Crawl Space Sealing Costs in the DMV
Costs vary based on the size of the crawl space, the number of entry points, whether drainage is needed, and the condition of existing insulation. Typical ranges:
- Pest and gap sealing only (small projects) – $1,500 to $3,500
- Sealing with vapor barrier and vent closure – $4,000 to $7,000
- Full sealing with drainage, sump pump, and insulation – $8,000 to $15,000
Free Inspection
Considering Crawl Space Sealing?
Our engineer-trained inspectors will identify exactly which sealing steps your crawl space needs – and recommend only the materials and systems that solve the actual problems we find. We serve DC, Maryland, and Virginia from local branches in Rockville, North Bethesda, Ashburn, and Manassas.
About DMV Waterproofing: Engineer-founded in 2005 by two UDC civil engineering graduates who began their careers as foundation field inspectors at ECS Limited. Based in Rockville, Maryland, with branches in North Bethesda, Ashburn, and Manassas. Over 20 years of field experience across the DMV. No subcontractors – every job done by our in-house crews.