

Crawl Space Encapsulation: 7 Critical Components Every DMV Homeowner Should Know
Crawl space encapsulation is a complete sealed envelope system. It is not just plastic on the dirt floor. In Washington DC, Maryland, and Northern Virginia, a real encapsulation system has to control ground vapor, humid outside air, condensation, insulation failure, drainage risk, and long-term access for maintenance.
DMV Waterproofing is engineer-founded since 2005, with 20+ years of experience inspecting crawl spaces, basements, foundations, and drainage problems across the DMV. We approach crawl space encapsulation through building science: stack effect, vapor drive, dewpoint, conditioned air, drainage integration, and code-compliant moisture control.
Most DMV crawl spaces fail for the same reason. The space below the home is treated like an outdoor void, but the air from that void is pulled upward into the living space. A sealed, controlled crawl space protects framing, indoor air, energy performance, and resale confidence.
Why DMV Crawl Spaces Need Encapsulation
DMV crawl spaces face a difficult mix of soil and climate. Heavy Piedmont clay and water table affect crawl space conditions because the soil holds moisture after storms and releases it slowly. When that moisture sits below the home, vapor rises into the crawl space even if no standing water is visible.
Summer air makes the problem worse. Mid-Atlantic dewpoints often reach 70-72°F. Crawl space surfaces can stay in the 60-65°F range. When warm humid air enters through vents and hits cooler framing, masonry, ductwork, or plumbing, condensation forms.
That moisture does not stay below the home. Stack effect pulls crawl space air upward into the first floor. If the crawl space is damp, moldy, or musty, that air can affect the living area. The EPA moisture control guidance explains why moisture control is the foundation of mold prevention.
Older homes in Montgomery, Fairfax, Arlington, and DC often still have vented crawl spaces from the 1960s through 1980s. Newer homes in Loudoun and Prince William can have cut-and-fill lot conditions that create perched water near foundations. In both cases, the answer is not more venting. The answer is a controlled envelope.
The 7 Critical Components of Complete Crawl Space Encapsulation
Component 1: Reinforced Vapor Barrier, 20-Mil Minimum
A true crawl space encapsulation system starts with a reinforced vapor barrier. Cheap 6-mil polyethylene is not encapsulation. It is a temporary cover that tears, shifts, and fails under service traffic.
For DMV crawl spaces, reinforced 20-mil polyethylene with woven scrim is the better standard. Seams should overlap at least 12 inches and be sealed with butyl seam tape or manufacturer-approved seam tape. The barrier should run up foundation walls at least six inches and be mechanically fastened or sealed so vapor cannot bypass the system at the edge.
Examples of professional-grade materials include Stego Wrap, Viper CS, and Americover. These are educational examples, not affiliate recommendations. The key is thickness, reinforcement, seam integrity, and wall attachment.
Component 2: Sealed Vents and Wall Penetrations
Traditional crawl space vents often make DMV moisture problems worse. During humid months, they allow wet outdoor air into a cooler space. That air can condense on joists, ducts, pipes, and masonry.
Encapsulation requires sealing exterior vents with durable foam board, sealant, and weather-resistant detailing. Plumbing penetrations, electrical conduit, HVAC penetrations, rim joist gaps, and duct chases also need attention. The access door should be insulated, gasketed, and sealed.
This is where crawl space sealing as a partial encapsulation step fits into the larger system. Sealing is one component. Encapsulation is the complete envelope.
Component 3: Dehumidification System
A vapor barrier alone does not control humidity. In a DMV summer, a sealed crawl space can still hold too much moisture if the air is not managed.
Most full encapsulation systems need a commercial-grade dehumidifier sized to the crawl space volume and moisture load. Common examples include Aprilaire 1830 or 1850 units, and Santa Fe Compact70 or Advance90 units. These are examples only. The system should be sized by condition, not by guesswork.
The target is usually 55% relative humidity or lower. Condensate should drain to a sump basin or be pumped to an approved discharge. The homeowner should be able to read humidity levels without crawling through the entire space.
Component 4: Conditioned Air or Mechanical Moisture Control
IRC R408.3 allows unvented crawl spaces when the space is properly sealed and moisture is controlled. The code generally requires one of several approaches: mechanical exhaust ventilation, conditioned air supply, or dehumidification, depending on the design and local adoption.
Most DMV projects use dehumidification as the primary moisture-control method, sometimes with a small conditioned-air connection where appropriate. A sealed crawl space with no air management can become stale, humid, or problematic.
County adoption and inspection expectations can vary in Montgomery, Fairfax, Loudoun, Prince William, Arlington, and DC. A contractor should understand the local code environment before sealing a crawl space.
Component 5: Insulation Strategy
Once a crawl space becomes part of the conditioned envelope, the insulation strategy changes. Floor fiberglass batts are often removed because they trap moisture, fall out of place, and lose R-value when damp.
In many encapsulated crawl spaces, rigid foam board or other vapor-resistant wall insulation performs better. A common goal is R-10 to R-13 at the crawl space walls, depending on design and local requirements. Pipe insulation should also be evaluated to reduce freeze risk.
The ENERGY STAR basement and crawl space insulation guidance is a useful external reference for understanding how air sealing, insulation, and moisture control work together.
Component 6: Drainage Integration When Needed
Encapsulation should not trap active water under a clean liner. If groundwater, seepage, or standing water is present, drainage must be handled before the vapor barrier goes down.
This is where crawl space waterproofing when groundwater is the source connects with encapsulation. Waterproofing manages liquid water. Encapsulation controls vapor and air. If the crawl space has liquid water, both systems may be needed.
Drainage may include a perimeter trench, perforated pipe, clean stone, filter fabric, sealed sump basin, cast-iron pump, battery backup, and approved discharge. The encapsulation system should be integrated around that drainage, not installed over an unresolved water problem.
Component 7: Sealed Access and Monitoring
A crawl space still needs service access after encapsulation. The access door should be insulated, sealed, and durable enough to maintain the envelope. It should not be permanently blocked by finish work or storage.
A humidity monitor should remain inside the crawl space, ideally with a homeowner-readable display. Future contractors should be able to see warning labels, service paths, sump access, dehumidifier access, and drainage components.
The best encapsulation systems are not just clean on day one. They are inspectable, serviceable, and maintainable 10 years later.
IRC R408.3: Building Code Requirements for Unvented Crawl Spaces
IRC R408.3 recognizes that unvented crawl spaces can work when they are properly designed. The key phrase is properly designed. Closing vents without air management is not the same thing as code-compliant encapsulation.
The code allows unvented crawl spaces when the ground is covered with a continuous vapor retarder, exposed earth is sealed, and the space is provided with approved moisture or air control. Depending on the design, that may include mechanical exhaust, conditioned air supply, or dehumidification.
The International Code Council code resources provide the broader framework for residential crawl space requirements. Local adoption can vary, so DMV Waterproofing evaluates county expectations before recommending a system.
For pre-2009 DMV homes with original vented crawl spaces, this matters. Many of those homes were built with the idea that outside air would dry the crawl space. In the Mid-Atlantic climate, outside air often adds moisture instead.
Encapsulation vs Vapor Barrier vs Waterproofing
Vapor Barrier Alone
A vapor barrier alone is plastic over the ground. It reduces ground vapor but does not seal vents, control humidity, insulate walls, manage air leakage, or remove liquid water. In a clean, dry crawl space, a vapor barrier may be enough as a basic improvement. It is not full encapsulation.
Crawl Space Waterproofing
Waterproofing manages liquid water: groundwater, seepage, ponding, drainage, sump systems, and discharge. It prevents water from collecting below the home. It does not automatically create a sealed, conditioned envelope.
Crawl Space Encapsulation
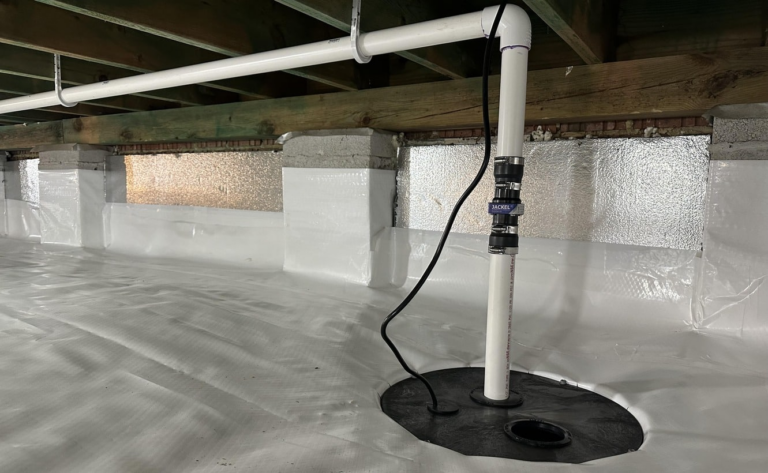
Crawl space encapsulation is the full sealed-envelope system: reinforced vapor barrier, sealed vents, sealed penetrations, dehumidification, air management, insulation strategy, and monitoring. Most DMV homes with groundwater issues need both waterproofing and encapsulation.
For homes where moisture has already damaged framing, review crawl space repair when structural damage has begun. For choosing a contractor, see how to choose a crawl space repair company.
When Not to Encapsulate Your Crawl Space
Encapsulation is not always the first move. Sometimes the honest answer is to wait until another problem is corrected.
- Active major water intrusion: Fix water entry first, then encapsulate.
- Severely damaged framing: Structural repair should come before sealing the space.
- Asbestos or vermiculite insulation: Abatement should happen before encapsulation work.
- Active termite or pest infestation: Treat the infestation before installing the envelope.
- Very low clearance: Some spaces are too tight for proper detailing and service access.
- Small budget and dry conditions: A basic vapor barrier may be enough in some clean, dry spaces.
If crawl space moisture has contributed to settlement or movement, foundation repair when crawl space moisture has caused settlement may need to be evaluated before encapsulation.
Crawl Space Encapsulation Costs in the DMV
Cost depends on size, access, moisture severity, drainage needs, debris removal, insulation removal, dehumidifier sizing, sump requirements, and whether structural repair is needed.
- Basic vapor barrier only: $1,500-$3,500. This is not full encapsulation.
- Vapor barrier plus sealed vents: $3,500-$6,000, depending on access and detailing.
- Full encapsulation: $6,000-$12,000 for vapor barrier, sealed vents, dehumidifier, insulation strategy, and air control.
- Encapsulation plus drainage system: $8,000-$15,000+ when liquid water, sump systems, or heavy moisture conditions are present.
0% APR financing through Wisetack may be available for qualified homeowners. Full encapsulation systems from DMV Waterproofing include a lifetime transferable warranty on encapsulation, which is a key difference between a complete system and a temporary liner installation.
Contractor Red Flags for Crawl Space Encapsulation
Encapsulation is easy to sell cheaply and hard to install correctly. Watch for warning signs before signing.
- “$500 encapsulation special” that is only thin plastic on the dirt.
- “Lifetime warranty” with no dehumidifier in the scope.
- Cheap 6-mil polyethylene presented as encapsulation grade.
- Skipping vent sealing or access-door sealing.
- No humidity control plan.
- Same-day install without moisture, drainage, and framing inspection.
- Subcontractor crews with unclear warranty accountability.
- Door-to-door sales pressure or today-only pricing.
A real encapsulation estimate should describe the barrier thickness, wall attachment, vent sealing, dehumidification, insulation strategy, drainage integration, access detailing, and warranty coverage.
Annual Maintenance for Encapsulated Crawl Spaces
A crawl space encapsulation system should be checked once a year. Most issues are quick fixes when caught early.
- Check the vapor barrier for tears, displacement, loose seams, or wall detachment.
- Test the sump pump and battery backup where installed.
- Clean the dehumidifier filter and verify the condensate line is open.
- Check humidity readings. The target is usually below 55% relative humidity.
- Confirm vent caps and access-door seals are still secure.
- Look for pest activity, new staining, or standing water.
- Inspect visible foundation cracks or movement that could create water entry risk.
If you see new mold, odor, or staining, review mold control in encapsulated crawl spaces. Cleaning the symptom without correcting humidity or water entry will not solve the source.
Why DMV Homeowners Choose DMV Waterproofing for Encapsulation
- Engineer-founded since 2005: DMV Waterproofing was founded by UDC civil engineering graduates who began as foundation field inspectors at ECS Limited.
- 20+ years of DMV field experience: We understand Montgomery, Fairfax, Loudoun, Prince William, Arlington, DC, and nearby conditions.
- In-house crews only: We do not use subcontractors for encapsulation systems.
- Free no-pressure inspection: We evaluate drainage, vapor, humidity, insulation, access, and framing.
- Lifetime transferable warranty: Full encapsulation systems include lifetime transferable warranty coverage.
- Financing options: 0% APR financing through Wisetack may be available for qualified homeowners.
- Broader water-control expertise: We also provide basement waterproofing services and drainage solutions when the crawl space problem connects to exterior water.
Many encapsulation projects begin with the same water pathways described in the seven entry points water uses. A complete inspection looks at the whole lower envelope, not just the floor liner.
Frequently Asked Questions
What is the difference between crawl space encapsulation and a vapor barrier?
A vapor barrier is one material layer over the soil. Crawl space encapsulation is the complete sealed envelope: reinforced vapor barrier, sealed seams, sealed vents, wall attachment, dehumidification, insulation strategy, and monitoring. A vapor barrier can reduce ground vapor, but it does not control all crawl space moisture sources by itself.
How long does crawl space encapsulation last?
A properly installed encapsulation system can last 20-25 years or longer with annual maintenance. Dehumidifiers may need replacement after 8-12 years, and sump pumps usually require replacement after 7-10 years depending on use. Warranty terms depend on the installed system.
Do I need a dehumidifier with crawl space encapsulation?
In most DMV homes, yes. A sealed crawl space still sees seasonal humidity loads. Without dehumidification or approved air management, humidity can stay high enough to support odor, mold risk, and wood moisture problems.
Can I encapsulate my crawl space myself?
A basic vapor barrier in a clean, dry crawl space may be a reasonable DIY project. Full crawl space encapsulation is different. It may require drainage, sump work, vent sealing, air management, wall insulation, access detailing, and code awareness. Most DMV homes need professional evaluation before the space is sealed.
Will crawl space encapsulation reduce my energy bills?
It can. Encapsulation reduces uncontrolled humid air, protects ductwork, improves floor comfort, and helps the HVAC system operate in a more stable lower-envelope environment. Savings vary by home, duct location, insulation condition, and humidity control.
Does crawl space encapsulation increase home value?
It can support resale value by removing a major inspection concern. Buyers are more comfortable with a clean, documented, warrantied crawl space than with exposed soil, falling insulation, odor, or visible moisture. A lifetime transferable warranty can be especially helpful during resale.
What permits are required for crawl space encapsulation in the DMV?
Simple vapor barrier work often does not require a permit. Drainage, sump discharge, mechanical ventilation, electrical work, or HVAC air changes may require permits depending on the county and scope. Montgomery, Fairfax, Loudoun, Prince William, Arlington, and DC may handle requirements differently.
Can I encapsulate over existing fiberglass insulation?
Usually no. Wet, fallen, or moldy fiberglass should be removed before encapsulation. In a conditioned crawl space, wall insulation often replaces floor insulation. Leaving failed insulation in place traps odor and moisture above the new liner.
Schedule a Free Encapsulation Inspection
If your crawl space smells musty, has exposed soil, wet insulation, high humidity, mold, standing water, or falling fiberglass, schedule a free encapsulation inspection with DMV Waterproofing.
Call 1-833-888-2533, email info@dmvwp.com, or visit dmvwp.com. We send a trained technician, not a salesperson, to inspect the crawl space, explain the moisture source, and provide a clear written plan. Our Rockville in North Bethesda, Ashburn, and Manassas offices serve Washington DC, Maryland, and Northern Virginia.